Revised July 10 2016
I have used Dell’s SonicWALL firewalls at several employers. From TZ190’s to NSA 3600’s. I am no expert on SonicOS or SonicWALLs in general, but I have been either the I.T. person who made the decision to use them, or I have had administrative access to them so I could perform maintenance. I’m much more experienced at the Windows server and desktop level.
It’s relatively easy to connect a Windows machine/client, to a SonicWALL firewall using their free Global VPN Client. But it’s always been a headache to connect a Mac OSX computer, to a SonicWALL firewall. Well let me take that back. It’s relatively easy to use equinux’s VPN Tracker to connect to a SonicWALL. Somehow VPN Tracker “just works” with little configuration. But it also costs $60.00 to $70.00 per license/computer. If you work for a large organization, buying VPN Tracker for your Mac VPN Connectivity needs, should be a no-brainer. But for those of you who work for smaller companies who question a lot of expenses, and you have Mac computers, then Lobotomo’s free IPSecuritas VPN Client may be for you. If it works out for you, I do encourage you click their Donate button and give what you can.
It took me quite awhile to finally get IPSecuritas working with the latest SonicWALL firewall I’ve been connecting to, an NSA 3600. The firmware version on the SonicWALL I’m using is SonicOS Enhanced 6.2.2.2-19n. Your settings may differ if you are using a different SonicWALL or a different firmware version – but things should be similar, in the same classes of firewalls. And the IPSecuritas version I’m using is V4.6.1.
I read several guides, and tried countless combinations of settings. I credit the following guides, for getting me started:
- The basic IPSecuritas to SonicWALL V3 guide
- wimpog’s blog reply on SonicWALL NSA 2400 VPN
- a blog post by kleetus on SonicWALL enhanced firmware
- Sean LaBrie’s article on Configuring IPSecuritas for Use with a SonicWall TZ190 Enhanced
- And a somewhat unrelated blog post on Connecting a Mac to a SonicWALL via LT2P
All of the above are somewhat old articles, often referencing much older versions of SonicOS firmware or the IPSecuritas client itself.
Most of the above articles attempt to explain their settings by describing the settings/options to select. And the problem is, with older versions of the firmware or IPSecuritas client, some of the settings/options have changed and it’s a bit difficult to understand some of what is described.
I’m going to show you the setup primary via screenshots. With some descriptions only going into detail about options that may differ on your setups.
Keep in mind that what worked for me, may not work for you. Plus, you really need to have administrative access to your SonicWALL, or know the I.T. person who does, who can help you sort this out.
SONICWALL SETUP
VPN > SETTINGS MENU
On this page, click the Edit link to the right of WAN GlobalVPN. See below:
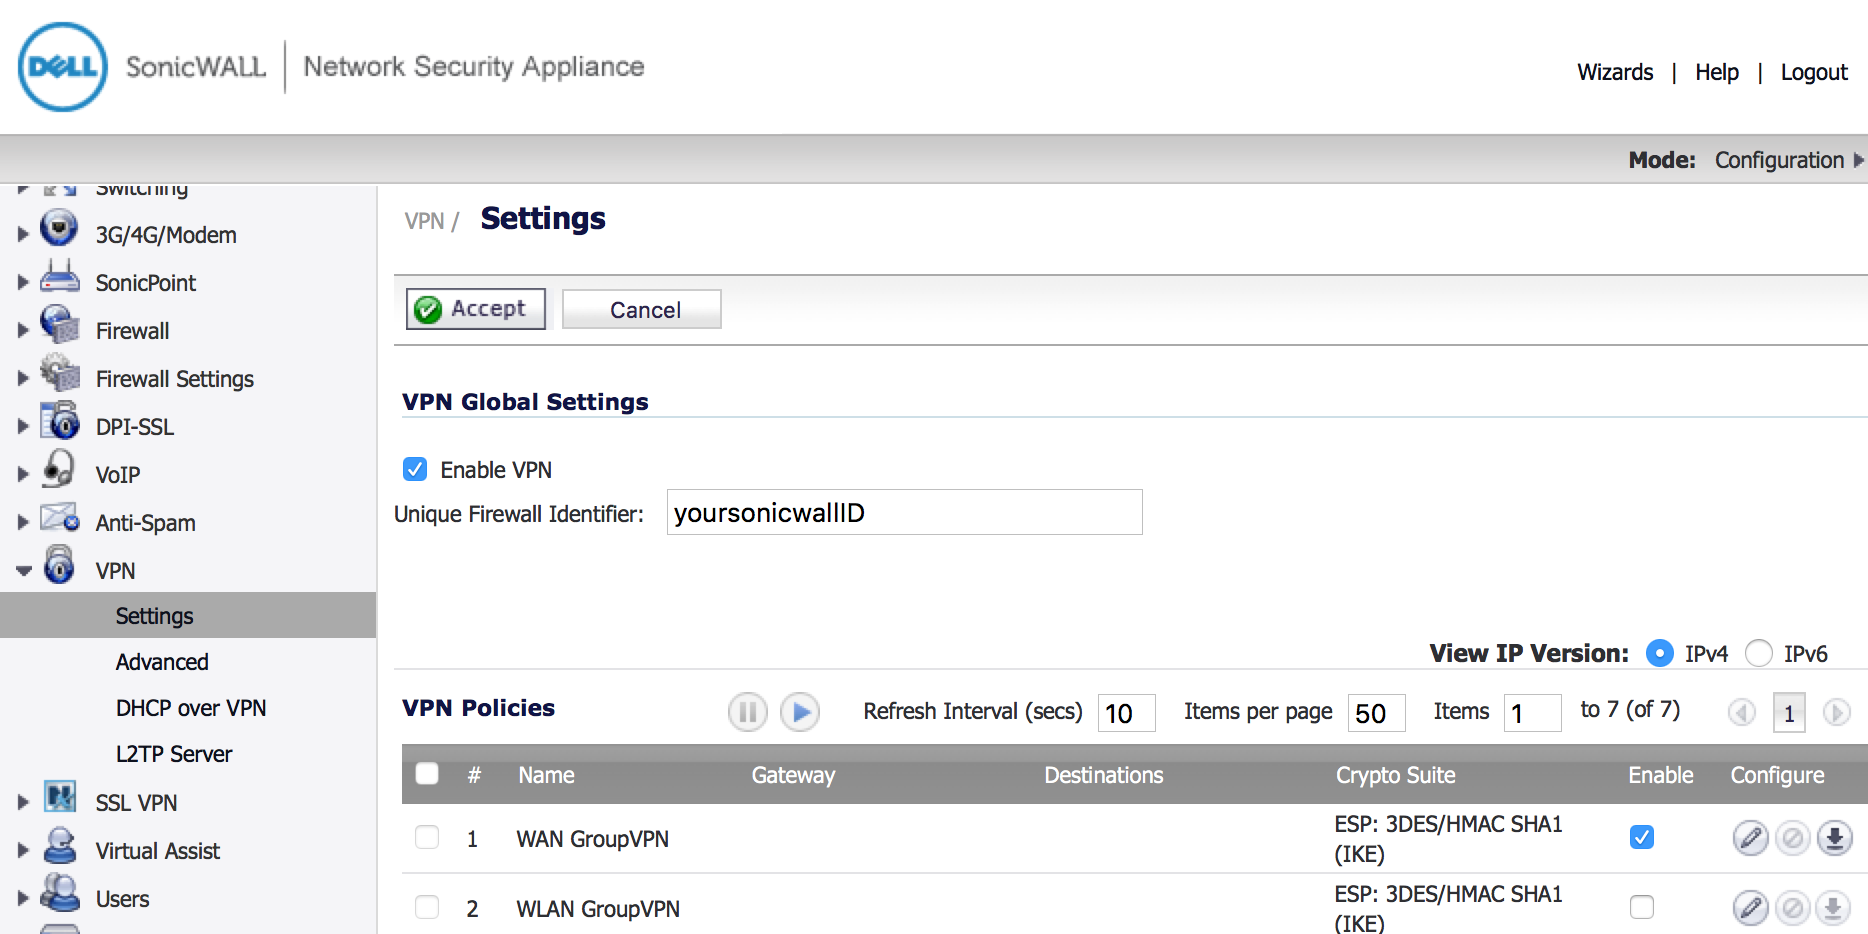
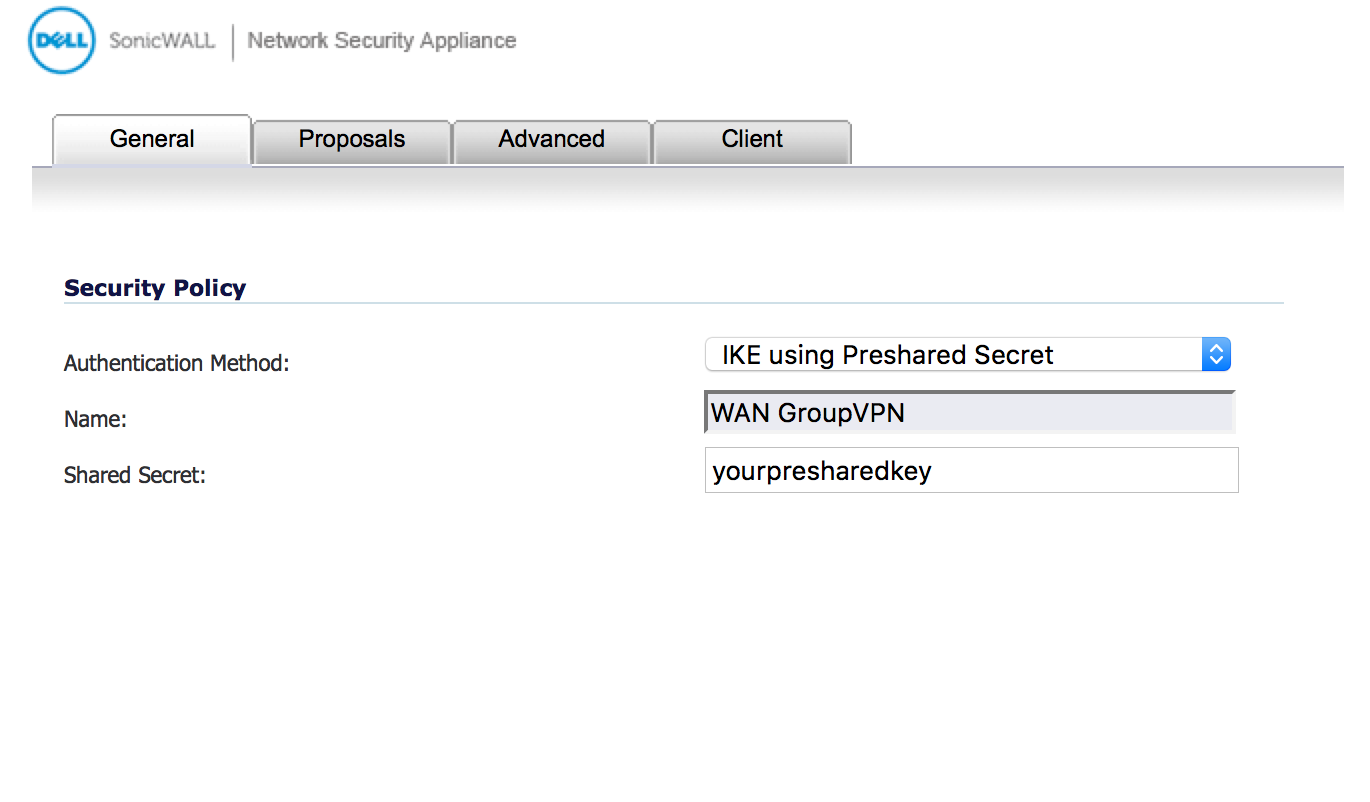
VPN > SETTINGS > GENERAL
Change the “Shared Secret” from yourpresharedkey to a key that you choose. See below:
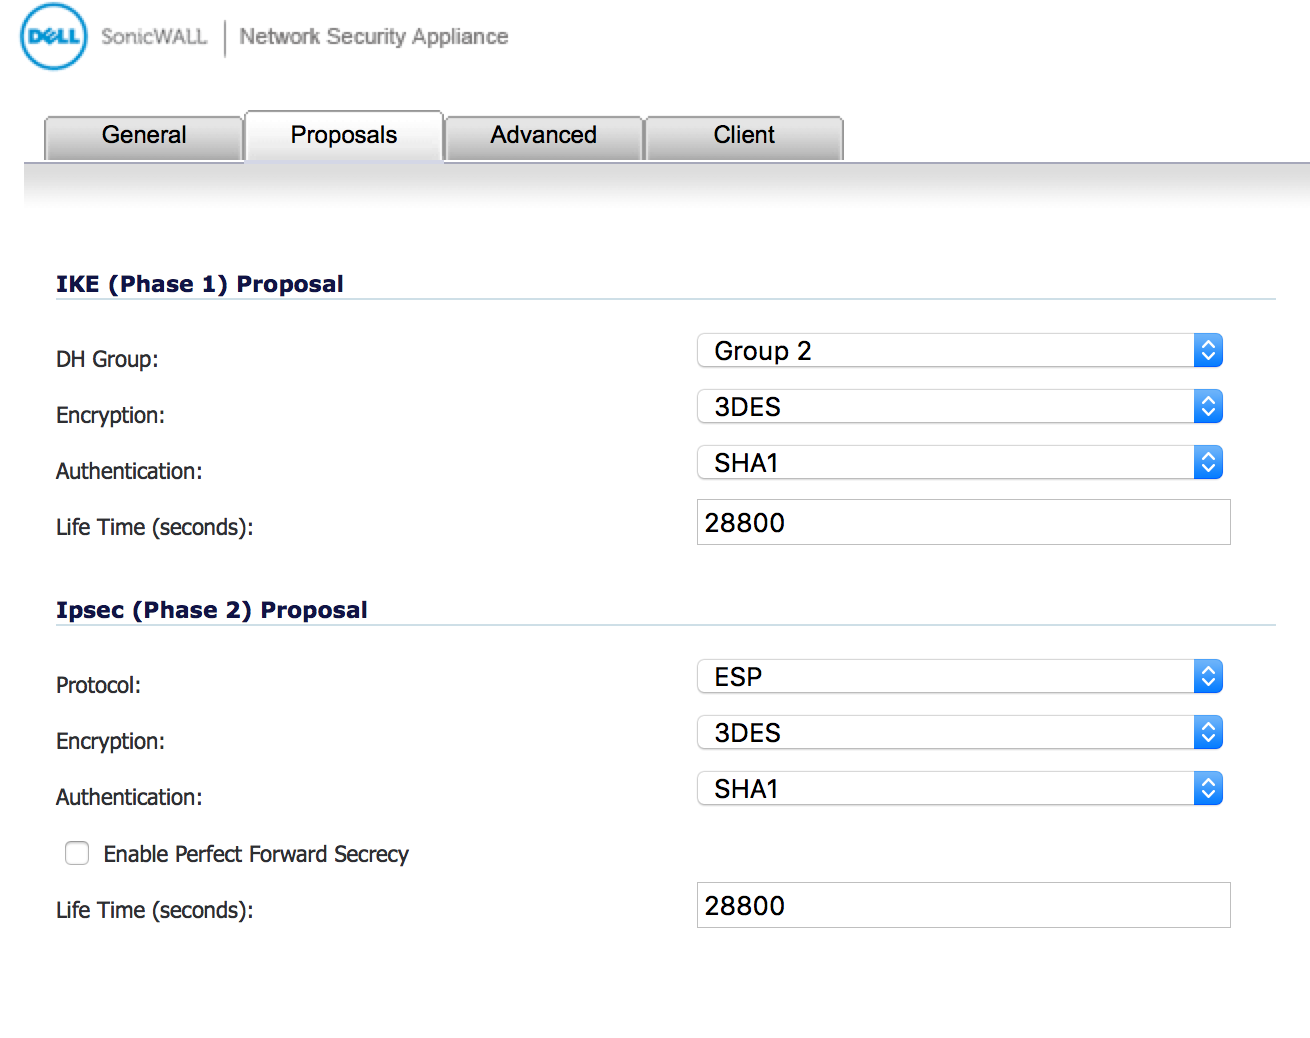
VPN > SETTINGS > PROPOSALS TAB
Ensure your settings are the same as below:
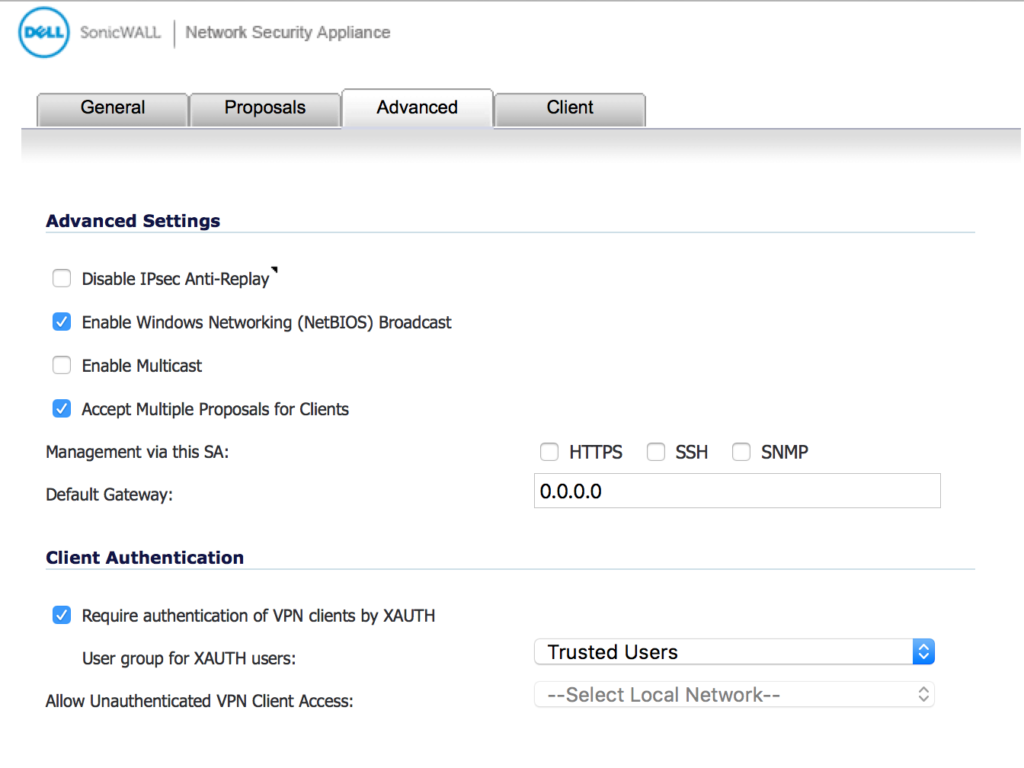
 VPN > SETTINGS > ADVANCED TAB
Set your Advanced tab options as per below. However it’s important to note that if your SonicWALL is configured to make people login with a SonicWALL Username/Password, then your “Require authentication of VPN clients by XAUTH” must be checked, and the “Use Group for XAUTH users” is probably “Trusted Users”.
This means that in the “Users” section of SonicWALL, each User under “Local Users” must be configured on the “Groups” tab, to be a member of “Trusted Users”. There may be other configurations necessary in the Local Users section.
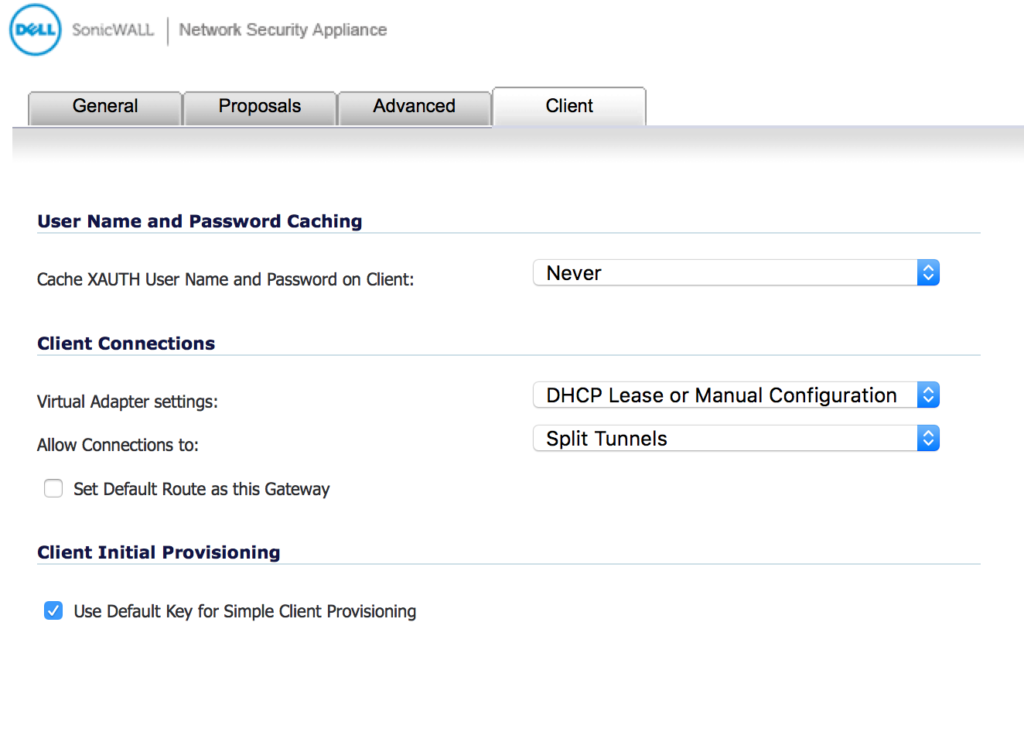
 VPN > SETTINGS > CLIENT TAB

One important change I made here, was to change “Virtual Adapter settings” from simply “DHCP Lease” to “DHCP Lease or Manual Configuration”. With just “DHCP Lease”, my IPSecuritas would not complete the connection.
I also enabled “Use Default Key for Simple Client Provisioning”
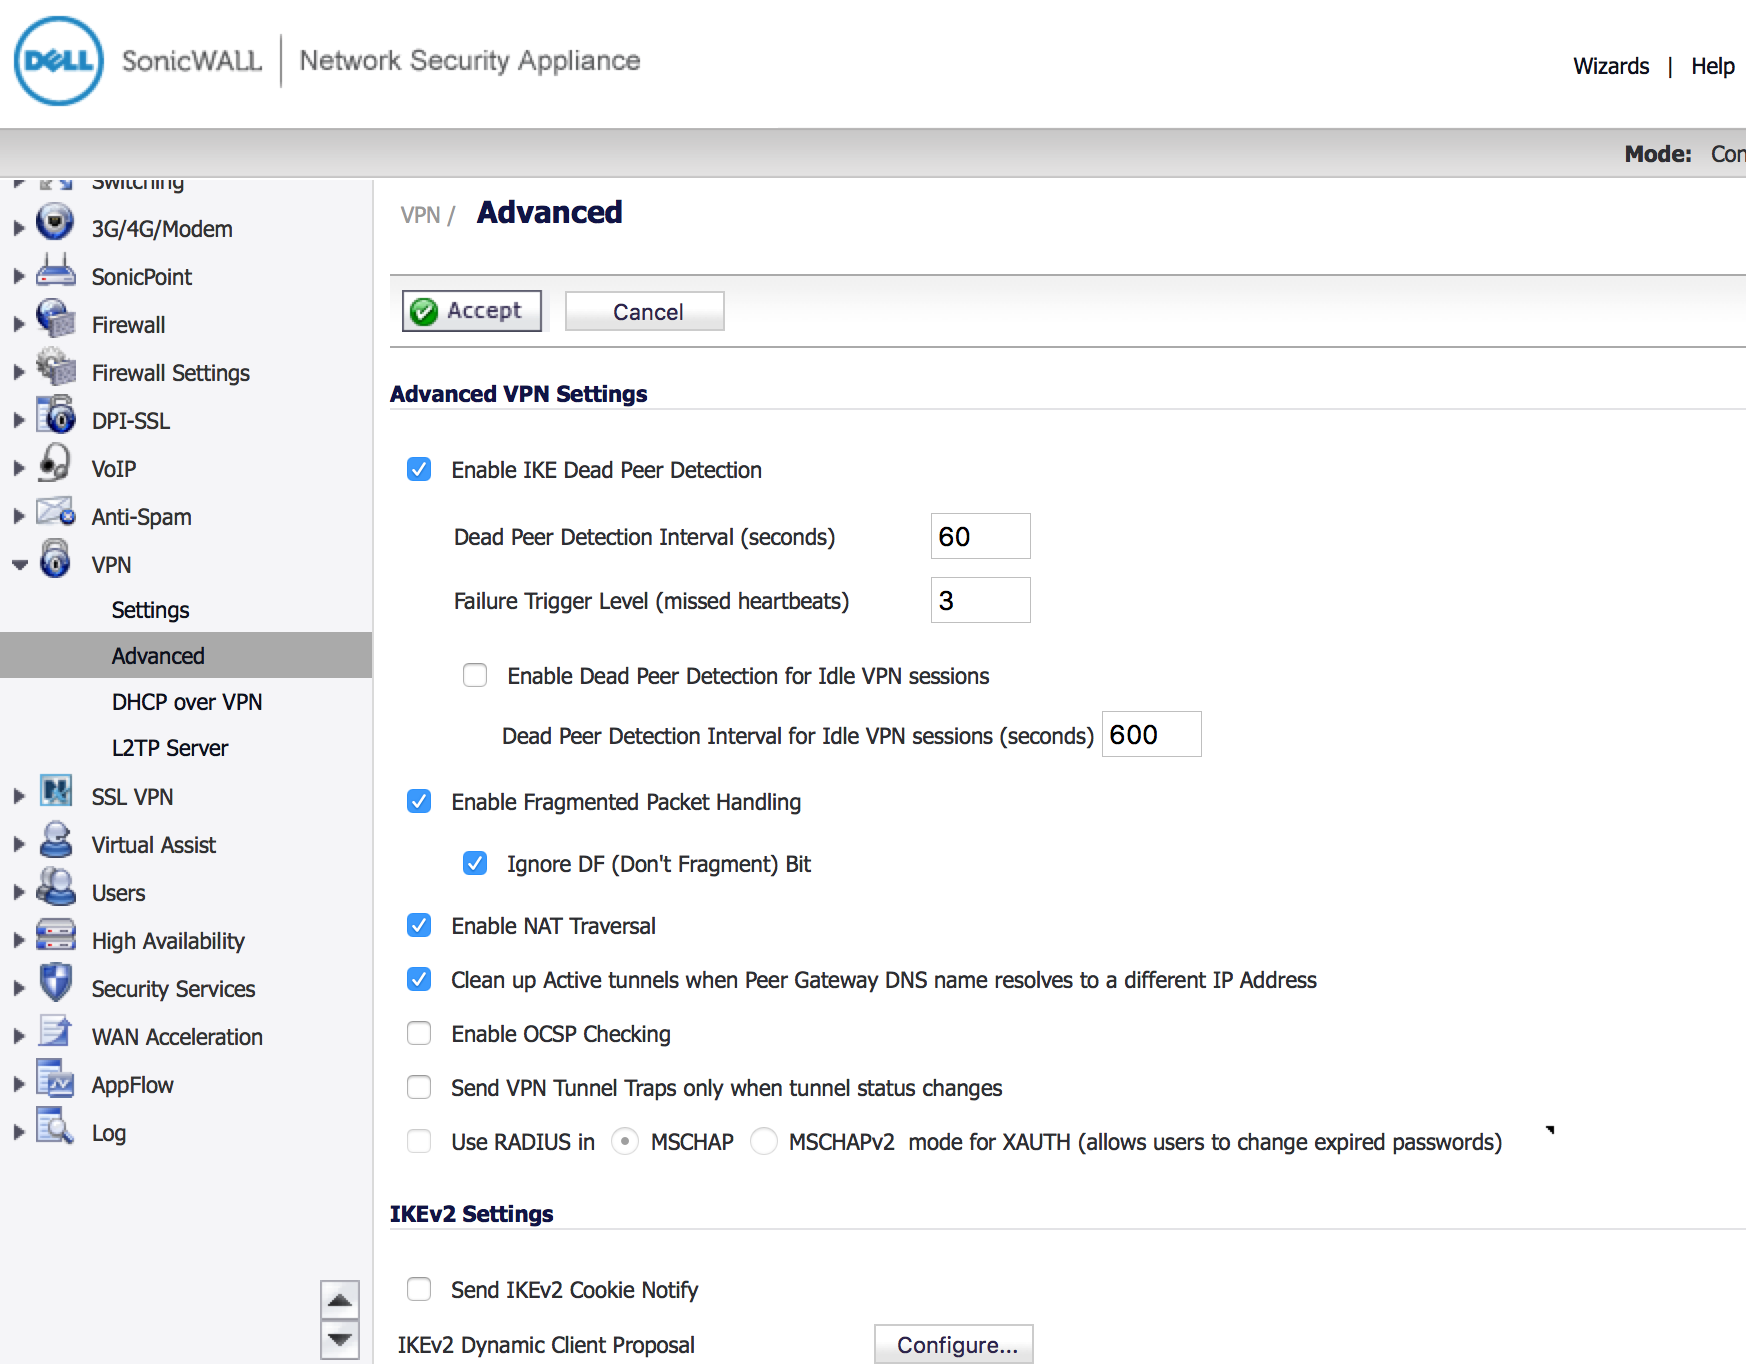
 VPN > ADVANCED

I’m not sure if there were any changes on this page. Set as per below:
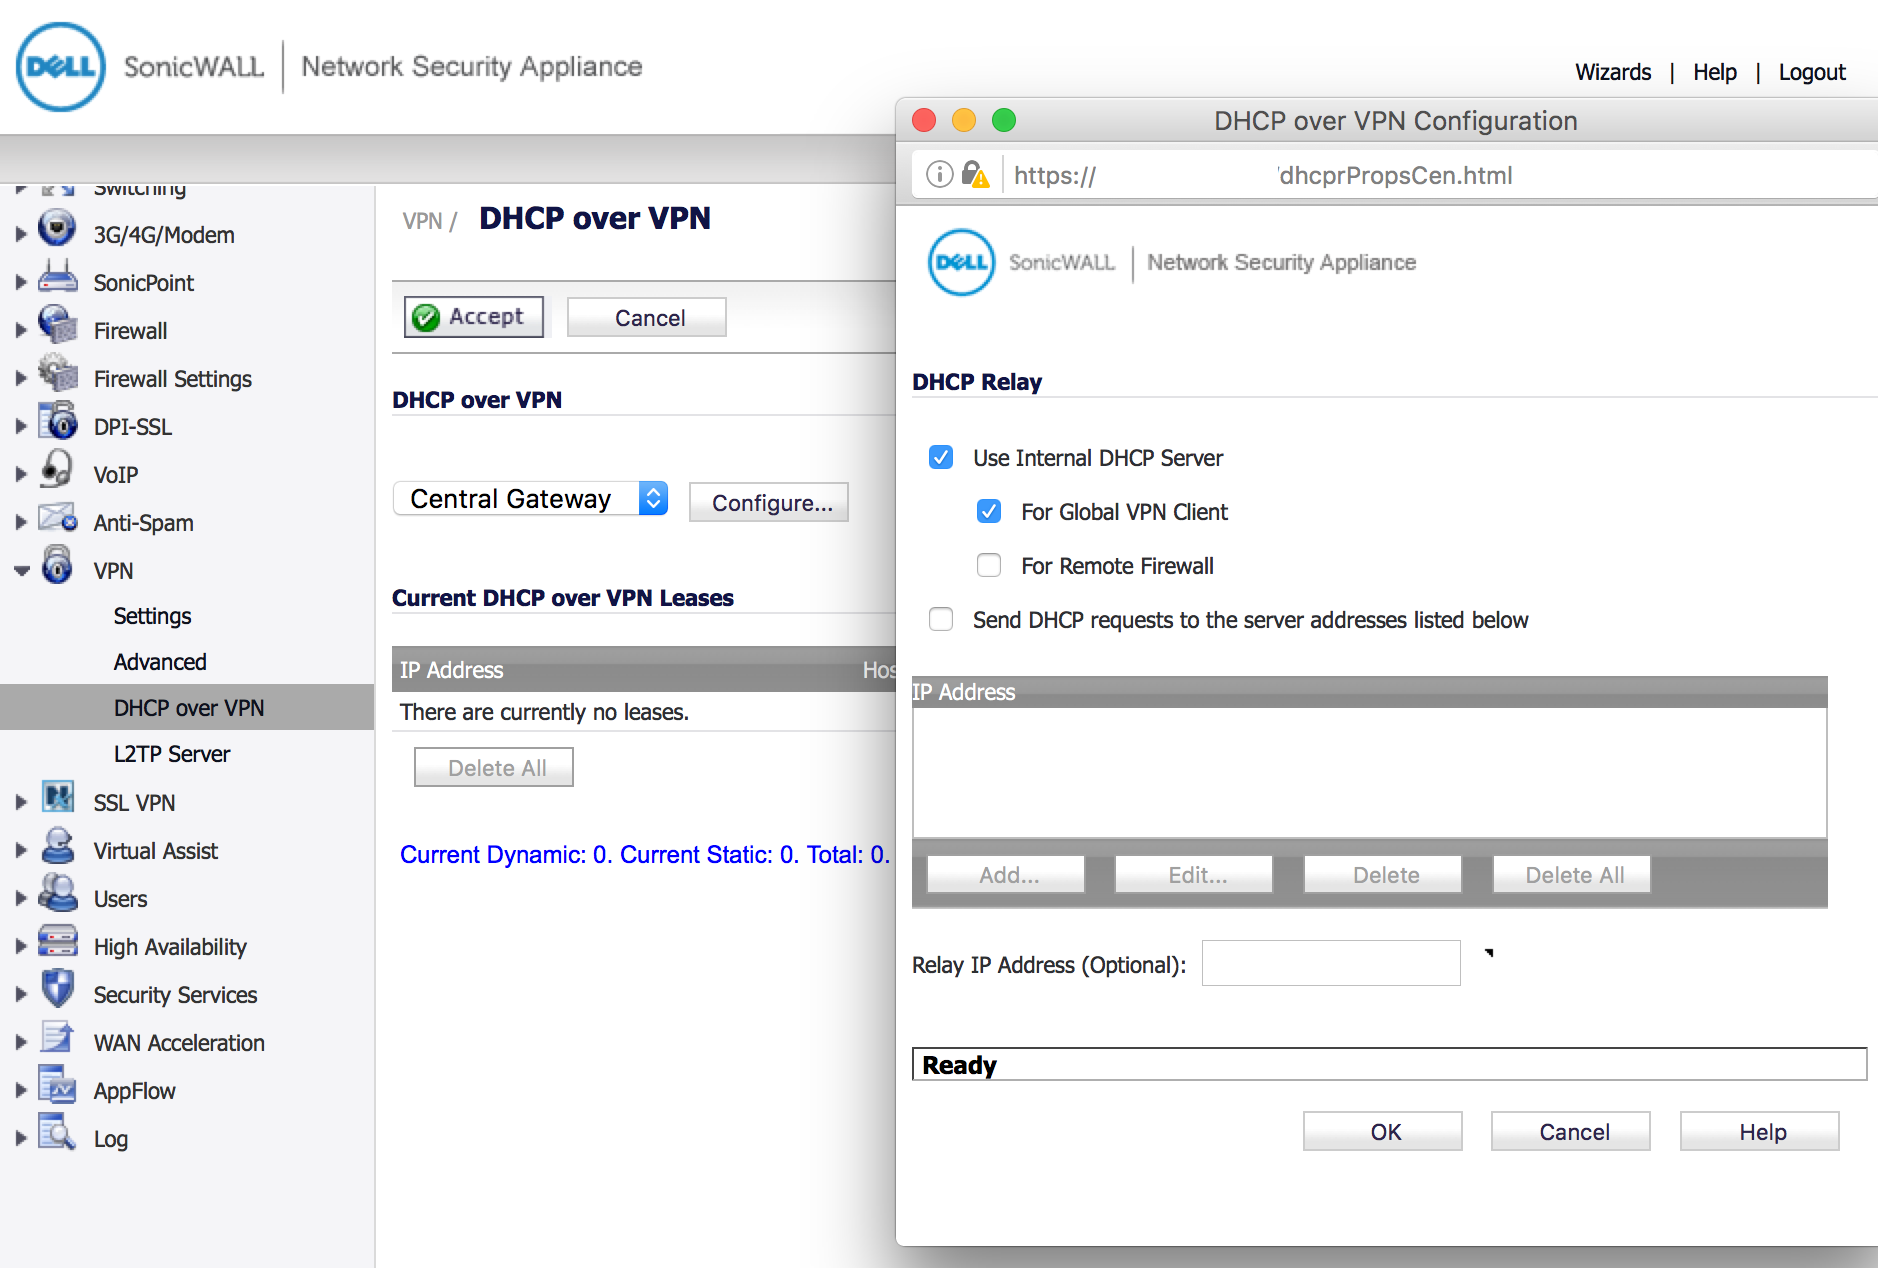
VPN > DHCP over VPN
Click “Central Gateway” and then click “Configure”. Make sure your options are set the same as below:
IPSECURITAS SETUP
GENERAL TAB
Create a new connection (sample here is “Test Connection” and under the General tab, put your IP address in place of “yoursonicwall-IP”. Set other options as below.
However note that if your IP Address range, where you are connecting to, is different than 192.168.1.#, then you should specify the correct subnet.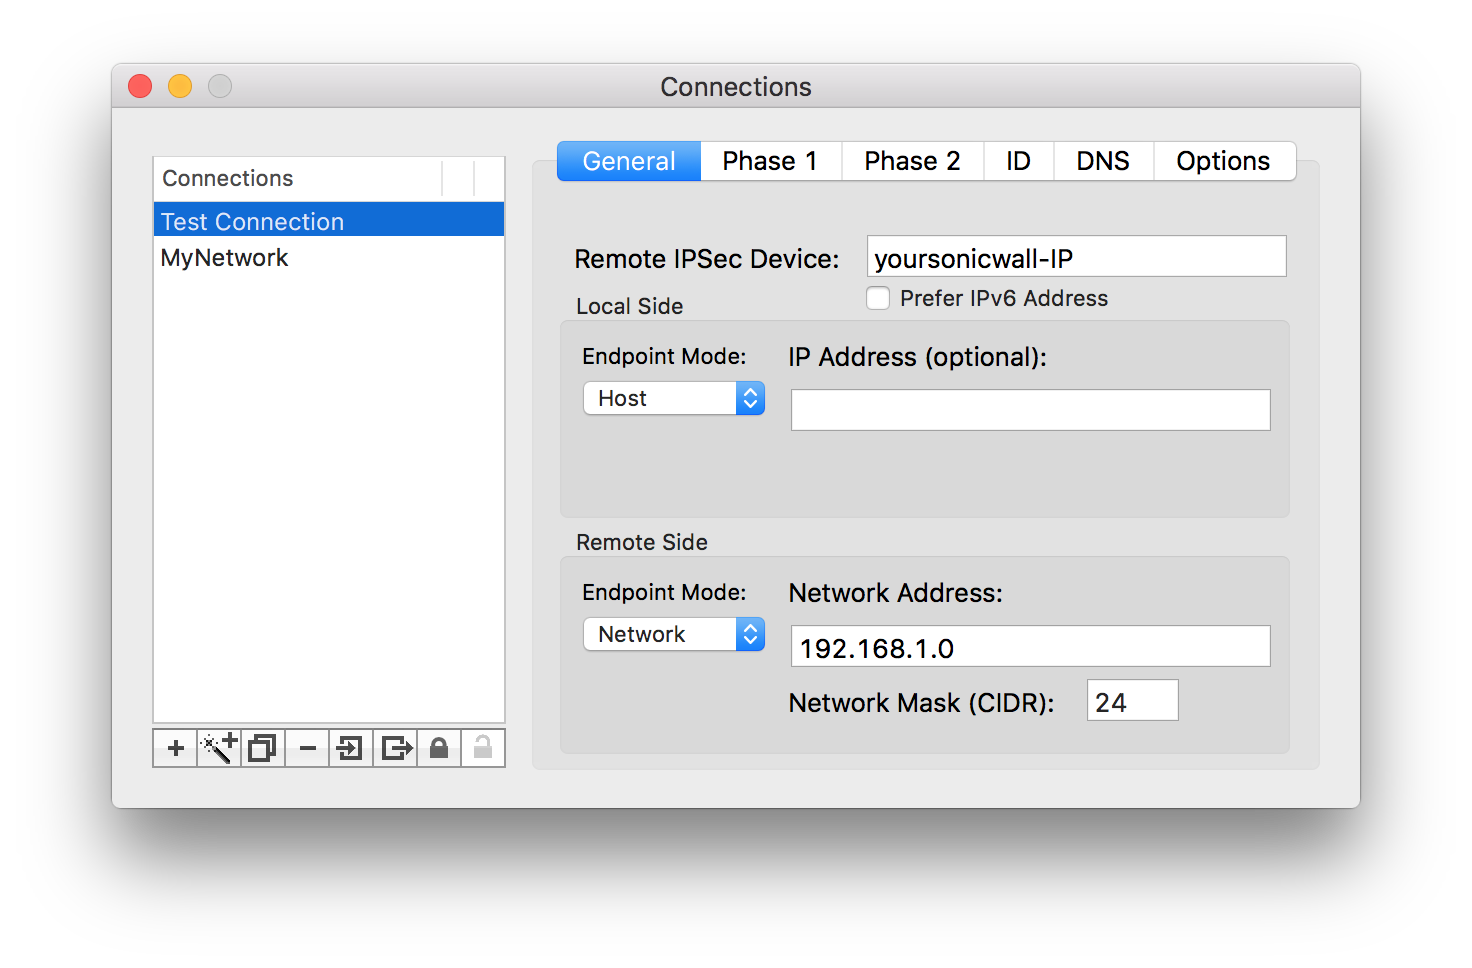
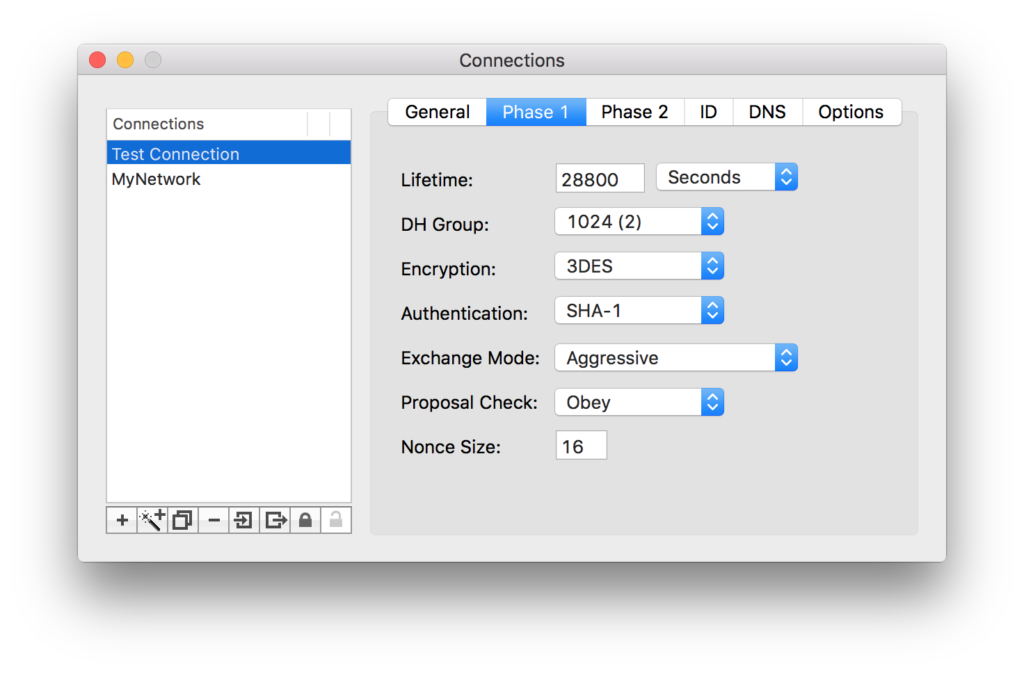
PHASE 1 TAB
Set your Phase 1 as below:
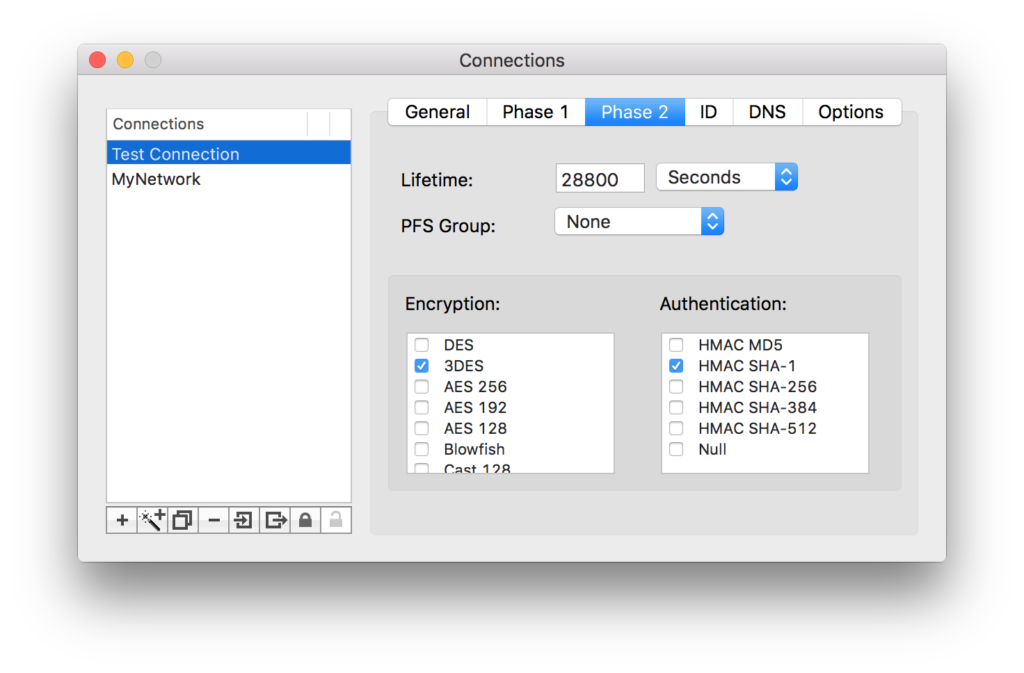
 PHASE 2 TAB

Set your Phase 2 as below:
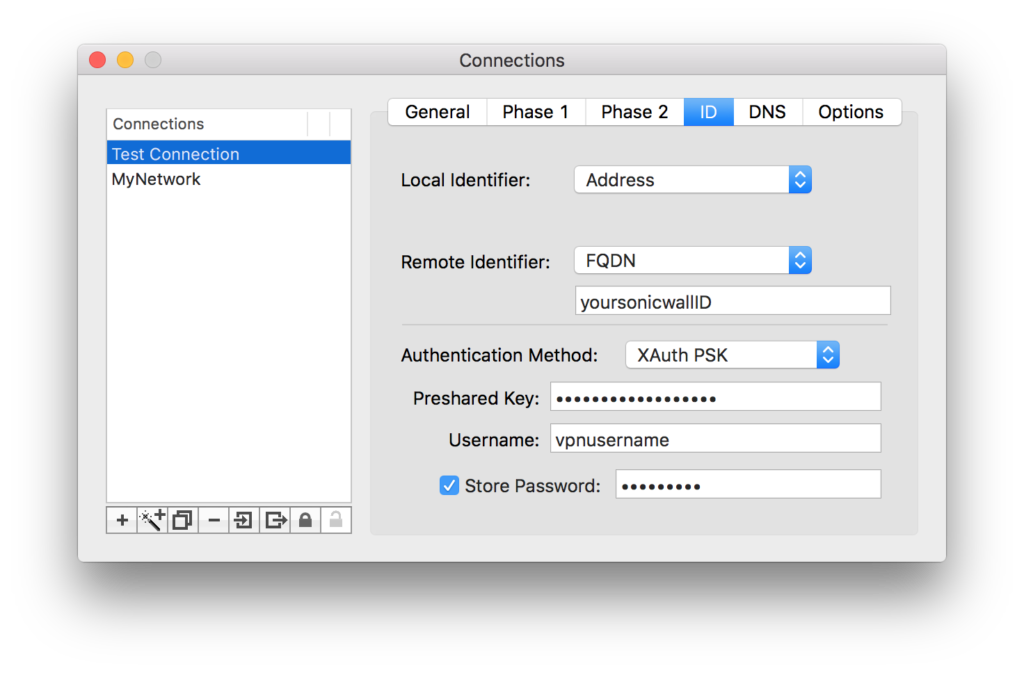
 ID TAB

Set the fields in your ID tab as below. But under Remote Identifier change “yoursonicwallID” to match the “Unique Firewall Identifier” you specified on your SonicWALL under VPN > SETTINGS
On your SonicWALL under VPN > SETTINGS > ADVANCED TAB > CLIENT AUTHENTICATION, if you clicked the Check-Box next to “Require authentication of VPN clients via XAUTH” then be sure to select “XAuth PSK” on the IPSecuritas “ID” tab below. If you didn’t select that checkbox, then you need to match the alternative authentication methods that you used on your SonicWALL – or you will not be able to connect.
Assuming you seelcted XAuth PSK above, then specify the same Preshared Key that you specified on your SonicWALL under VPN > SETTINGS > [Edit] WAN GROUPVPN > GENERAL TAB > SHARED SECRET FIELD
In the Username field, specify the same “Name” field you specified on your SonicWALL under USERS > LOCAL USERS
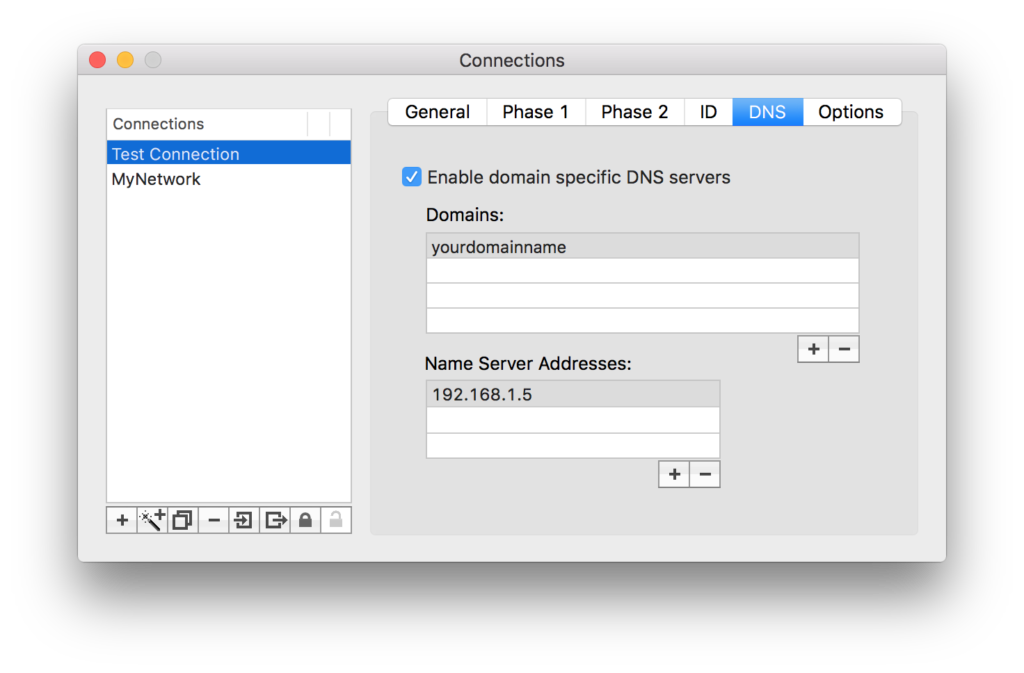
 DNS TAB

Under “Domains” replace “yourdomainname” with your local network Domain Name, assuming you have one.
Under Name Server Addresses, specify the IP Address of your internal DNS server, assuming you have one.
If you do not have an internal DNS server, I assume you remove the checkmark next to “Enable”. I’ve always had internal DNS servers so I’m not sure what effect, removing this will have.
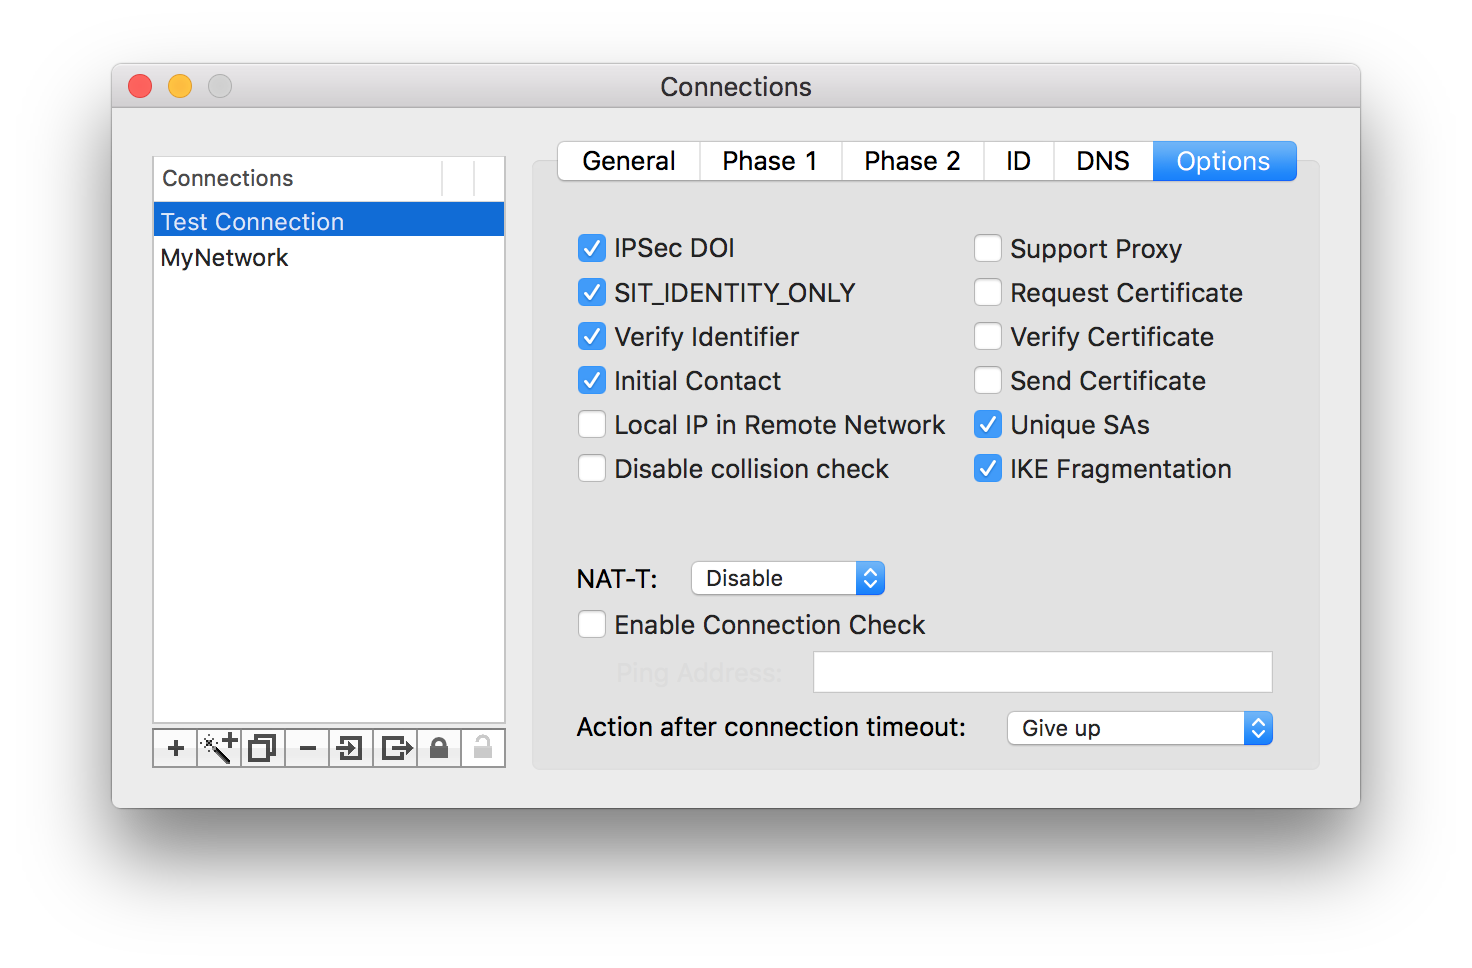
 OPTIONS TAB

Set your checkboxes to match those below.
Note that most IPSecuritas and SonicWALL help sites I’ve read, say to also select “Disable” next to NAT-T. However for my circumstances, I found that I had to “Enable” NAT-T, in order to subsequently be able to connect to my servers via Windows Explorer and specifying their \\#.#.#.# IP address, or to use Remote Desktop for that matter.
FINAL NOTES
Remember that every situation is different. You may have some SonicWALL settings that are slightly different, which could mean your IPSecuritas will not connect, if it’s settings don’t match the SonicWALL.
If it doesn’t work, y best advice, read the other older articles I linked to above, in addition to mine, and try and find the culprit!
I wish you the best of luck!
Darren Nye